Reposted from former blog, Just Add Sparkles.
This is a project I've been working on for quite a while now. I wanted to get it just right. I've been experimenting with different materials, designs, and patterns. I finally created three totally awesome headbands. One out of rope - which is the rock-star of this line up. One out of an old t-shirt and one out of old elastic headbands.
• • •
I'll show you the basics of how to make these headbands and you can go crazy with that info and experiment like I did. Or just make these, because they are awesome.
Please enjoy my awkward selfies. The left image the headband is made out of an old t-shirt and the right image is out of old elastics.
First, let's start with the knot. It's super simple actually, just follow the directions below.
(I don't know the real name of the knot so I call it "a really awesome knot." Clever, I know.)
First I'll show you how I made the headband out of old elastics.
Take your elastic headbands - old or new - and cut them so they no longer connect. Then start the knot! (I doubled up both sides of the knot so it would be thicker.)
So you have your knot, right?
Good.
Now take the ends and sew a straight line across the four pieces to keep them together like you see below.
Once you've done that to both ends you're going to connect them. Take your hot glue and add a strip of glue on the tips of the elastic to connect the two sides. Then take a needle and thread and start stitching everything together for extra support.
Then either cut a small piece of fabric, or do what I did and grab a little bit of elastic and wrap it around the stitched up part to cover that mess.
I just hot glued this bad boy on. And wa-la! You're done with headband number one.
To make the t-shirt headband I basically took the same steps. I cut out strips from the t-shirt (pulled on the fabric to make it stretch and roll up nicely), made the knot and instead of sewing or stitching anything I only used hot glue to connect it, and then I covered up the ugly hot glue mess with a strip of that same t-shirt. SUPER simple I tell you!
• • •
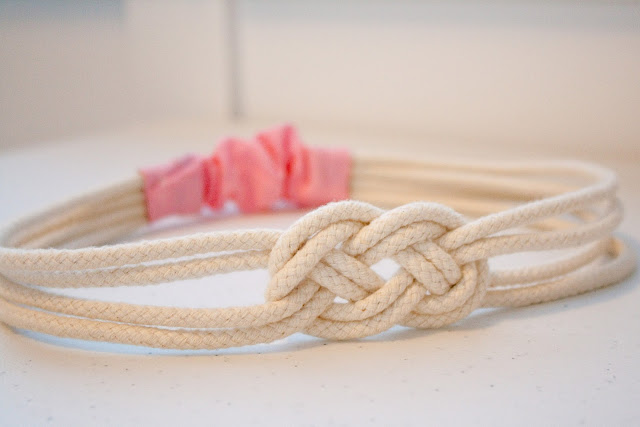
Next let's move on to the grand finale! The KNOTTED ROPE HEADBAND. My all time favorite. Now this one isn't quite as simple as the above because the rope isn't stretchy. But I'll show you how you overcome that obstacle.
What you need:
• 3 yrds of rope (to be safe)
• elastic
• a really small amount of fabric
• sewing machine
• needle & thread
• hot glue gun
First take the rope and tie the knot above (when you cut your rope make sure it's extra long, bigger than the size of your head because the knot takes out some length.) I cut out four strips of rope and doubled up each side of the knot.
Once you have your knot wrap the rope around your head to measure. Trim the ends so you leave about an inch to an inch & a half of space between the ends when wrapped around your head.
Next we need to stitch up the ends so they stay together.
(I added hot glue to the tips so they didn't fray.)
After you've done that to both ends take your elastic and cut it to be about an inch and a half long. (You'll have to measure for yourself exactly what it should be. You can do that by safety pinning the elastic to the rope and testing it on your head until you get the right fit.)
Next start to stitch the elastic on to the rope - ONLY ON ONE SIDE. Go crazy with it like I did, it will all be covered up in the end.
Before we stitch the other side we need to create our cover that goes over the ugliness.
Take a piece of fabric - you can make the color match your rope, I just liked the pink - and cut out a piece that is double the size of your elastic in length and make the width a little over double the size of width of the rope.
Sew little hems along the edges of the width and then fold your fabric (with the backside of your hems showing) hotdog style. Yes, you heard me - hotdog style. And then sew a straight line near the edge, like you see below.
Now turn that tube inside-out.
Next slide it on to your elastic and rope, double check that the tube fits on both ends of the rope before we stitch up the other side.
Once you have your tube on, start stitching on the other side of the elastic and attach it to the rope.
Okay, we're almost done. Now take your hot glue gun and glue on the tube to cover up the stitched up elastic and you should end up with something looking like this . . .
The fabric should be bunched up like that so when the elastic is stretched the fabric won't be too short and stop it from stretching.
My lovely hand model is showing you what it will look like stretched.
Now put on this sucker and strut your stuff!


No comments:
Post a Comment